
GTM Server-Side Data Residency - Regional Load Balancers and Cloud DNS Geo-Routing
Yes, yes, I know. It’s been a while since my last post on this blog. Life got busy, projects piled up, Christmas break came up, and writing simply become a secondary priority (if even). But I’m back now, kicking off 2026 with a technical post.
Those who have followed my posts on GTM Server-Side (sGTM), by now probably know that I’m a big fan of the technology. The ability to process data server-side, enrich it with first-party data, and maintain control over what gets sent to vendors has changed how we approach data collection.
But one challenge keeps surfacing in conversations with clients, particularly those in regulated industries: data residency. The question usually comes from legal or IT security teams: “Can you guarantee that our European users’ data never leaves European infrastructure?”
Since I couldn’t find any other content addressing this challenge, I decided to go down this rabbit hole of my own and summarize my findings in this post. So, I’ll walk through the complete architecture, and provide the gcloud commands to deploy this yourself. Heads up: this is more complex than a standard deployment. But it was definitely fun to implement.
Let’s get into it!
The “Problem” with Standard sGTM Deployments
Before going into detail, let’s understand why the standard sGTM deployment doesn’t satisfy strict data residency requirements. Which isn’t really a flaw in the technology, but rather a matter of how Google Cloud Platform’s (GCP) networking options are designed and the trade-offs each one comes with.
When you follow Google’s official documentation, you typically end up with an architecture that looks something like this: Cloud Run services running your sGTM container, sitting behind a Global External Application Load Balancer, with a single anycast IP address serving traffic worldwide. This setup is elegant and easy to manage. Traffic from anywhere in the world resolves to the same IP, enters Google’s global network at the nearest edge location, and gets routed internally to your Cloud Run service.
Google’s global network is optimized for low-latency delivery, and the anycast architecture means users connect to the nearest point of presence. For the vast majority of GTM Server-Side deployments, this is exactly what you want.
But this is exactly where it breaks down for data residency purposes: when a user in Copenhagen sends a request to your tracking endpoint, that request enters Google’s global network at a Danish edge location, but it then travels across Google’s private backbone to reach your Cloud Run service. While Google’s infrastructure is sophisticated and generally routes traffic efficiently, there’s no architectural guarantee that the traffic stays within a specific geographic boundary. The global load balancer treats the entire network as one unified system, optimizing for performance rather than geographic containment.
For legal and compliance teams operating under strict interpretations of data protection regulations, “it probably stays in Europe” isn’t sufficient. They need deterministic routing—a guarantee that can be documented and defended in an audit.
GCP offers several load balancing options, each with different characteristics. Here’s how they stack up for our use case:
| Load Balancer Type | Scope | Data Residency | Use Case Fit |
|---|---|---|---|
| Global External Application LB | Global | No guarantee | Standard deployments prioritizing performance |
| Cross-Region LB | Global (private) | No guarantee | Internal services, not applicable for public tracking endpoints |
| Regional External Application LB | Single region | Guaranteed | Compliance-focused deployments requiring data residency |
You can read more about the various load balancer options and when to choose which one in Google’s documentation.
The Regional External Application Load Balancer is the key to solving our problem. Unlike its global counterpart, a regional load balancer operates exclusively within a single GCP region. Traffic enters and exits through that region’s infrastructure only. When you pair this with GCP’s Standard Tier networking (as opposed to their Premium Tier), traffic travels over the public internet until it reaches the specific target region, rather than entering Google’s global backbone at the nearest edge.
The combination of regional load balancers plus standard tier networking gives us the architectural guarantee we need: A request from a user in Europe hits the European load balancer, gets processed by the European Cloud Run service, and can never enter infrastructure outside of Europe.
The trade-off, of course, is complexity. Instead of managing one global load balancer, we now need to deploy and maintain independent infrastructure stacks for each region we want to serve. We need a mechanism to route users to the correct regional endpoint. And we lose some of the performance optimizations that come with Google’s global network.
For organizations where data residency is a hard requirement, these trade-offs are acceptable. The architecture I’ll walk through next shows how to build this multi-region setup while still presenting a unified tracking endpoint to the outside world.
Architecture Overview
Now that we’ve covered the short comings of the standard deployment, let’s have a look at the architecture that solves for true data residency. The core principle is somewhat straightforward: instead of one global infrastructure, we deploy independent, region-specific services that operate in complete isolation from each other.
Each regional stack contains its own complete GTM Server-Side environment: a production Cloud Run service, a preview Cloud Run service, a Regional External Application Load Balancer, SSL certificates, and a dedicated IP address. What happens in Europe stays in Europe. What happens in the US stays in the US. The stacks share nothing except the domain name that users interact with.
Here’s what the architecture looks like:
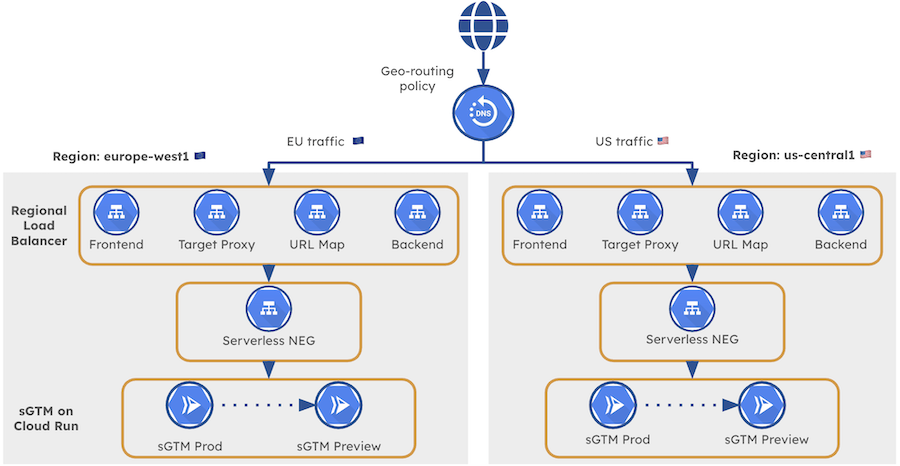 GTM Server-Side Architecture with Regional Load Balancers & Cloud DNS
The “magic” that ties these independent stacks together is Cloud DNS with geo-routing policies. When a user’s browser resolves your tracking subdomain (e.g., sgtm.gunnargriese.com), Cloud DNS examines the user’s geographic location and returns the IP address of the appropriate regional load balancer. A user in Germany gets the European IP. A user in California gets the US IP. From the user’s perspective, they’re hitting the same endpoint. Under the hood, they’re being routed to a completely separate infrastructure.
Traffic Flow for a European User
Let’s check exactly what happens when a European user triggers a GA4 event on your website for which server_container_url is set to sgtm.gunnargriese.com. Understanding this flow is essential for both the implementation and for explaining the architecture to potential compliance stakeholders.
-
Step 1: DNS Resolution The user’s browser needs to resolve
sgtm.gunnargriese.comto an IP address. The DNS query reaches Cloud DNS, which evaluates the geo-routing policy. Based on the request’s origin, Cloud DNS returns the IP address reserved for theeurope-west1regional load balancer. -
Step 2: Request Ingress The user’s browser establishes a connection to the European IP address. Because we’re using Standard Tier networking, this traffic travels over the public internet directly to the Regional External Application Load Balancer in
europe-west1. -
Step 3: Processing The load balancer forwards the request to the
eu-sgtmCloud Run service running in the same region. Your GTM Server-Side container processes the event, applies any transformations or enrichments you’ve configured, and dispatches data to your configured vendors. -
Step 4: Preview Mode Handling If the request includes the
X-Gtm-Server-Previewheader (indicating someone is using GTM’s preview mode), the production container internally forwards the request to theeu-sgtm-previewCloud Run service. This happens entirely within the European region.
Result: Complete Data Residency From the moment the DNS query resolves to the moment your container finishes processing, every GA4 event stays within European infrastructure. This is the guarantee that satisfies strict compliance requirements.
Handling Users Outside Defined Regions
Now you might ask: What happens to users who aren’t in a region you’ve explicitly configured? If you’ve set up the infra for Europe and the US, where does traffic from Asia, South America, or Africa go?
Cloud DNS geo-routing handles this nicely through implicit fallback behavior. When a request comes from a region without an explicit routing rule, Cloud DNS routes it to the nearest available region based on network topology. In practice, this typically means users in Australia might resolve to your US endpoint, while users in Africa might resolve to Europe, depending on their specific location and network path.
This fallback ensures you never drop requests from unexpected locations. However, if you have significant traffic from other regions or face data residency requirements for additional geographies, you can extend the architecture by deploying additional regional infra and adding dedicated geo-routing rules.
What Does the Regional Infra Look Like?
Each regional stack consists of the following components, all deployed within a single GCP region:
| Component | Purpose | Example (Europe) |
|---|---|---|
| Production Cloud Run Service | Processes live tracking requests | eu-sgtm |
| Preview Cloud Run Service | Handles GTM preview/debug mode | eu-sgtm-preview |
| Serverless NEG | Connects Cloud Run to the load balancer | sgtm-neg-eu |
| Backend Service | Defines how traffic reaches your services | sgtm-backend-eu |
| Regional SSL Certificate | Encrypts traffic for your domain | sgtm-cert-eu |
| URL Map | Routes requests to the backend | sgtm-urlmap-eu |
| Target HTTPS Proxy | Terminates SSL and applies URL mapping | sgtm-proxy-eu |
| Forwarding Rule | Binds the external IP to the proxy | sgtm-frontend-eu |
| Reserved External IP | The public IP address for this region | sgtm-ip-eu |
This might look like a lot of components, and honestly, it is. GCP’s load balancing architecture is modular by design, which gives you flexibility but also means more pieces to configure and maintain. The good news is that once you understand the pattern, replicating it for additional regions becomes easy (or you might event want to automate it using Terraform).
Implementation Deep-Dive
Now that we’ve got a grasp of the architecture, let’s get our hands dirty. This section provides the complete gcloud commands to deploy the multi-region GTM Server-Side infrastructure. I’ll walk through each component in the order you need to create them, explaining what each command accomplishes and highlighting configuration choices you might want to adjust for your environment.
Before we begin, make sure you have the following prerequisites in place:
- A GCP project with billing enabled
- The
gcloudCLI installed and authenticated (or you simply use the GCP Cloud Shell to save you some hassle) - A domain you control with access to DNS records
- Your sGTM container configuration string (the
CONTAINER_CONFIGvalue which you can find under Admin > Container Settings) - A VPC network created for the load balancer components (I’ll use
load-balancer-networkin the examples)
I’ll demonstrate the setup for two regions: europe-west1 (Belgium) and us-central1 (Iowa). You can adapt these commands for any regions that meet your requirements.
Step 1: Deploy GTM Server-Side Containers to Cloud Run
First, we deploy the Cloud Run services that will run your sGTM containers. Each region needs two services: a preview server for GTM’s debug mode and a production server that handles live traffic. You can find the detailed instructions in Google’s manual provisioning guide.
# Deploy European preview server
gcloud run deploy "eu-sgtm-preview" \
  --region europe-west1 \
  --image gcr.io/cloud-tagging-10302018/gtm-cloud-image:stable \
  --min-instances 0 \
  --max-instances 1 \
  --timeout 60 \
  --allow-unauthenticated \
  --no-cpu-throttling \
  --update-env-vars \
    RUN_AS_PREVIEW_SERVER=true,\
    CONTAINER_CONFIG="<YOUR_CONTAINER_CONFIG>"

# Deploy European production server
gcloud run deploy "eu-sgtm" \
  --region europe-west1 \
  --image gcr.io/cloud-tagging-10302018/gtm-cloud-image:stable \
  --platform managed \
  --ingress all \
  --min-instances 0 \
  --max-instances 1 \
  --timeout 60 \
  --allow-unauthenticated \
  --no-cpu-throttling \
  --update-env-vars \
    PREVIEW_SERVER_URL="$(gcloud run services describe eu-sgtm-preview \
      --region europe-west1 \
      --format='value(status.url)')",\
    CONTAINER_CONFIG="<YOUR_CONTAINER_CONFIG>"
Now, repeat the same commands for the US region, changing the region and service names accordingly.
Step 2: Create Proxy-Only Subnets
Regional External Application Load Balancers require dedicated proxy-only subnets. These subnets are used exclusively used by the load balancer’s proxy infrastructure and cannot host other resources.
# Create proxy-only subnet for Europe
gcloud compute networks subnets create proxy-only-subnet-eu \
  --purpose=REGIONAL_MANAGED_PROXY \
  --role=ACTIVE \
  --region=europe-west1 \
  --network=load-balancer-network \
  --range=10.129.0.0/23

# Create proxy-only subnet for US
gcloud compute networks subnets create proxy-only-subnet-us \
  --purpose=REGIONAL_MANAGED_PROXY \
  --role=ACTIVE \
  --region=us-central1 \
  --network=load-balancer-network \
  --range=10.130.0.0/23
Make sure the IP ranges you choose don’t overlap with existing subnets in your VPC. The /23 range provides 512 addresses, which is more than sufficient for most deployments.
Step 3: Reserve Static IP Addresses
Each regional load balancer needs its own (external IP address)[https://docs.cloud.google.com/vpc/docs/ip-addresses]. We reserve these as static IPs to ensure they don’t change, which is critical since these addresses will be configured in your DNS records.
# Reserve European IP address
gcloud compute addresses create sgtm-ip-eu \
  --region=europe-west1 \
  --network-tier=STANDARD
# Reserve US IP address
gcloud compute addresses create sgtm-ip-us \
  --region=us-central1 \
  --network-tier=STANDARD
Note the --network-tier=STANDARD flag. As described before, this is a critical piece for our data residency requirements. Standard Tier networking routes traffic over the public internet to the specific region, rather than entering Google’s global network at the nearest edge location. This is what guarantees traffic destined for Europe actually arrives in Europe without entering other regions.
Take a note of these addresses, since you’ll need them later when configuring Cloud DNS.
Step 4: Create Serverless Network Endpoint Groups
(Network Endpoint Groups (NEGs))[https://docs.cloud.google.com/load-balancing/docs/negs] connect your Cloud Run services to the load balancer infrastructure. For serverless backends like Cloud Run, we use serverless NEGs.
# Create NEG for European production server
gcloud compute network-endpoint-groups create sgtm-neg-eu \
  --region=europe-west1 \
  --network-endpoint-type=serverless \
  --cloud-run-service=eu-sgtm

# Create NEG for US production server
gcloud compute network-endpoint-groups create sgtm-neg-us \
  --region=us-central1 \
  --network-endpoint-type=serverless \
  --cloud-run-service=us-sgtm
Notice we’re only creating NEGs for the production servers, not the preview servers. The preview servers are called internally by the production servers when needed, but they don’t receive traffic directly from the load balancer.
Step 5: Create Backend Services
Backend services define how traffic is distributed to your NEGs. For our serverless setup, the configuration is straightforward.
# Create European backend service
gcloud compute backend-services create sgtm-backend-eu \
  --load-balancing-scheme=EXTERNAL_MANAGED \
  --protocol=HTTP \
  --region=europe-west1

# Create US backend service
gcloud compute backend-services create sgtm-backend-us \
  --load-balancing-scheme=EXTERNAL_MANAGED \
  --protocol=HTTP \
  --region=us-central1
Now, let’s attach the NEGs to their respective backend services:
# Attach European NEG to backend
gcloud compute backend-services add-backend sgtm-backend-eu \
  --region=europe-west1 \
  --network-endpoint-group=sgtm-neg-eu \
  --network-endpoint-group-region=europe-west1

# Attach US NEG to backend
gcloud compute backend-services add-backend sgtm-backend-us \
  --region=us-central1 \
  --network-endpoint-group=sgtm-neg-us \
  --network-endpoint-group-region=us-central1
Step 6: Set Up SSL Certificates
HTTPS is a non-negotiable for tracking endpoints. (GCP’s Certificate Manager)[https://docs.cloud.google.com/certificate-manager/docs/overview] can provision and manage SSL certificates for your domain, but it requires DNS-based domain validation.
First, create DNS authorizations for each region:
# Create DNS authorization for Europe
gcloud certificate-manager dns-authorizations create dns-auth-eu \
  --domain="sgtm.gunnargriese.com" \
  --location="europe-west1"

# Create DNS authorization for US
gcloud certificate-manager dns-authorizations create dns-auth-us \
  --domain="sgtm.gunnargriese.com" \
  --location="us-central1"
After creating each authorization, you need to retrieve the CNAME records that Google requires for domain validation:
# Get European DNS authorization details
gcloud certificate-manager dns-authorizations describe dns-auth-eu \
  --location="europe-west1"
This returns output like:
createTime: '2026-01-10T09:26:45.743951160Z'
dnsResourceRecord:
  data: abc123.1.europe-west1.authorize.certificatemanager.goog.
  name: _acme-challenge.sgtm.gunnargriese.com.
  type: CNAME
domain: sgtm.gunnargriese.com
Important: Add both CNAME records (EU & US) to your domain’s DNS configuration. The certificate provisioning will fail if Google can’t validate domain ownership. Each region generates a unique CNAME record with a different target, both you need to add.
Once the CNAME records are in place and have propagated (give it a few minutes), create the certificates:
# Create European certificate
gcloud certificate-manager certificates create sgtm-cert-eu \
  --domains="sgtm.gunnargriese.com" \
  --dns-authorizations="dns-auth-eu" \
  --location="europe-west1"

# Create US certificate
gcloud certificate-manager certificates create sgtm-cert-us \
  --domains="sgtm.gunnargriese.com" \
  --dns-authorizations="dns-auth-us" \
  --location="us-central1"
Once you’ve added the CNAME records, the certificate status should turn to ACTIVE within a few minutes. You can see this within the Certificate Manager section of the GCP Console.
Step 7: Configure URL Maps and Target Proxies
(URL maps)[https://docs.cloud.google.com/load-balancing/docs/url-map-concepts] define how incoming requests are routed to backend services. For our simple setup with a single backend per region, the configuration is minimal as we just set a default backend.
# Create European URL map
gcloud compute url-maps create sgtm-urlmap-eu \
  --default-service=sgtm-backend-eu \
  --region=europe-west1

# Create US URL map
gcloud compute url-maps create sgtm-urlmap-us \
  --default-service=sgtm-backend-us \
  --region=us-central1
(Target HTTPS proxies)[https://docs.cloud.google.com/load-balancing/docs/target-proxies] terminate SSL connections and apply the URL map routing:
# Create European target proxy
gcloud compute target-https-proxies create sgtm-proxy-eu \
  --certificate-manager-certificates=sgtm-cert-eu \
  --url-map=sgtm-urlmap-eu \
  --region=europe-west1

# Create US target proxy
gcloud compute target-https-proxies create sgtm-proxy-us \
  --certificate-manager-certificates=sgtm-cert-us \
  --url-map=sgtm-urlmap-us \
  --region=us-central1
Step 8: Create Forwarding Rules
(Forwarding rules)[https://docs.cloud.google.com/load-balancing/docs/forwarding-rule-concepts] are the last step of the load balancer configuration - we are getting close to be done. They bind everything together: the external IP address, the target proxy, and the port to listen on.
# Create European forwarding rule
gcloud compute forwarding-rules create sgtm-frontend-eu \
  --load-balancing-scheme=EXTERNAL_MANAGED \
  --network-tier=STANDARD \
  --network=load-balancer-network \
  --target-https-proxy=sgtm-proxy-eu \
  --target-https-proxy-region=europe-west1 \
  --region=europe-west1 \
  --address=sgtm-ip-eu \
  --ports=443

# Create US forwarding rule
gcloud compute forwarding-rules create sgtm-frontend-us \
  --load-balancing-scheme=EXTERNAL_MANAGED \
  --network-tier=STANDARD \
  --network=load-balancer-network \
  --target-https-proxy=sgtm-proxy-us \
  --target-https-proxy-region=us-central1 \
  --region=us-central1 \
  --address=sgtm-ip-us \
  --ports=443
Step 9: Configure Cloud DNS Geo-Routing
Alright, finally…we made it to the final piece of the setup (took us long enough!). This final step ties everything together. We configure Cloud DNS to route users to the appropriate regional load balancer based on their geographic location.
First, ensure you have a Cloud DNS managed zone for your domain. If you don’t have one already:
# Create DNS zone (if needed)
gcloud dns managed-zones create sgtm-zone \
  --dns-name="yourdomain.com." \
  --description="Zone for GTM Server-Side endpoints"
Now create the geo-routing record. You’ll need the IP addresses you reserved earlier:
# Create geo-routed A record
gcloud dns record-sets create sst.yourdomain.com. \
  --zone="sgtm-zone" \
  --type="A" \
  --ttl="60" \
  --routing-policy-type="GEO" \
  --routing-policy-data="europe-west1=YOUR_EU_IP;us-central1=YOUR_US_IP"
Replace YOUR_EU_IP and YOUR_US_IP with the actual IP addresses from Step 3.
To actually use the Cloud DNS geo-routing, make sure your domain’s nameservers point to Google’s Cloud DNS nameservers. This requires updating your domain registrar’s settings and adding these nameservers. You can find these in the Cloud DNS managed zone details.
Step 10: Verification
With everything deployed, now obviously we need to verify the setup is working correctly. The easiest way is to test the tracking endpoint by using a VPN to send events to your new endpoint from various locations and verifying they appear in the respective GTM’s preview mode (EU vs. US sGTM server) and your GA4 real-time reports.
Understanding the Trade-offs
By now, you’ve probably noticed that this architecture involves considerably more complexity than a standard sGTM deployment. Before committing to this approach, it’s, therefore, worth evaluating whether the benefits justify the added complexity for your specific situation. I want to stress that for the vast majority of use cases, the standard global deployment is perfectly adequate and much simpler to manage. Think carefully about whether you truly need to go down this road.
The GA4 Data Storage Reality
I mentioned this in the introduction, but it bears repeating: this architecture controls where your data is processed, not where it’s ultimately stored.
When your sGTM container forwards events to GA4, that data is transmitted to Google’s infrastructure and stored on servers located in the United States. This is true regardless of which regional endpoint processed the initial request. The same applies to most other marketing and analytics vendors: your server container can process data in Europe, but the moment it sends that data to a third-party service, you’re subject to that service’s data storage policies. Unless the vendor explicitly offers data residency options (Amplitude, for example, has EU data residency; Piwik Pro stores data exclusively in the EU), you can’t control where they store your data.
Have this conversation with your legal and compliance stakeholders before investing in implementation. Make sure everyone understands exactly what this architecture does and doesn’t guarantee.
Alternative Approaches
If you’d rather not use Cloud DNS, you can configure geo-routing directly at your existing DNS provider—assuming they support geo-routing policies. Providers like Cloudflare offer this capability (afaik). In that case, you’d create the geo-based A records there and skip the Cloud DNS setup entirely. The regional load balancer and Cloud Run setup remains the same.
If managing your own infrastructure feels like overkill, a managed service like Stape’s EU-hosted sGTM offering might be a viable alternative. They handle the setup and maintenance, providing a compliant European endpoint without the operational overhead.
Ultimately, there’s no universally correct answer. The right architecture depends on your specific regulatory environment, risk tolerance, technical capacity, and business priorities. My goal with this post is to give you the information and implementation details needed to make an informed decision and execute on it if you choose to proceed (and to have some fun with GCP :wink:).
Conclusion
Data residency requirements aren’t going away. If anything, I expect them to become more common as regulatory frameworks mature, the world is increasingly turning back towards unilaterism, and organizations adopting more conservative interpretations of data protection obligations. Having a proven architecture to address these requirements is valuable, even if you don’t need it today.
The approach outlined in this post combines Regional External Application Load Balancers with Cloud DNS geo-routing—provides genuine architectural guarantees for data processing locality. Traffic from European users stays on European infrastructure. Traffic from US users stays on US infrastructure. No ambiguity, no “probably,” no reliance on Google’s internal routing decisions.
Is it more complex than a standard deployment? Absolutely. Is it worth it? That depends entirely on your specific compliance requirements and risk tolerance. For organizations facing strict data residency mandates, this architecture delivers what’s needed: deterministic geographic routing that can be documented, audited, and defended. For everyone else, the standard global load balancer deployment remains an excellent choice that’s simpler to operate and performs well globally.
If you’re implementing this architecture and run into challenges, or if you’ve found alternative approaches to solving data residency for GTM Server-Side, I’d love to hear about it. Feel free to reach out on LinkedIn, since these conversations often surface improvements and are invaluable to me.
Happy tracking!