
GTM Server-Side Pantheon - Part 3 - Integrate A Marketer's Go-To Tools - Google Sheets & BigQuery
Welcome to part three of my ongoing series on the GTM Server-Side Pantheon. In earlier posts, we explored the power of integrating Firestore into your GTM Server-Side (sGTM) setup and how Pub/Sub in combination with sGTM make your clickstream data even more valuable.
Today, we continue our journey in Greek mythology and tackle two of the most widely used tools by marketers and analysts—Google Sheets and BigQuery—through the Apollo and Chaos solutions from sGTM’s Pantheon. Both Google Sheets and BigQuery (BQ) are foundational for data-driven marketers and are probably used daily to store various data sets, analyze them, and create reports.
But when does it make sense to use Google Sheets and BQ in a server-side context? And how can you leverage the power of these tools in combination with sGTM? Let’s find out!
Standing on the Shoulders of Giants: Why Apollo and Chaos?
As with all solutions in the sGTM Pantheon, “Apollo” and “Chaos” aren’t just random names. They’ve been chosen from Greek mythology to represent the potential of Google Sheets and BigQuery for enhancing your GTM Server-Side workflows. Apollo, named after the god of knowledge, gives you real-time access to data stored in your Google Sheets, perfect for marketers wanting to incorporate business-relevant data on the fly. Chaos, symbolizing the vast expanse of BigQuery, allows you to store and (further down the line) analyze massive datasets effortlessly, turning raw data into insights.
Apollo – Reading Data from Google Sheets in Real-Time
Google Sheets is a go-to tool for marketers and a vast amount of business-critical company data is already available in a tabular format. Turning these sheets into interactive databases and having the ability to access and use this data in real-time to enrich your clickstream data sounds like a marketer’s wet dream.
Using Apollo, you can do just that! From my perspective, Apollo’s appeal is its simplicity and ease of use. You don’t need to configure complex APIs or use cloud-native databases. Instead, you can use a tool that you and your team are already familiar with and can manage themselves without having to rely on engineers or developers.
The original Apollo use case was to update conversion values or lead scores in real-time. This is particularly fitting for Google Ads campaigns, where real-time updates of the conversion values can significantly improve performance and ROI. At the end of the day, the idea behind this solution is the same as the Soteria approach, but with Google Sheets as the data source instead of Firestore to update the conversion value in real-time.
To avoid repeating myself and being able to show you something new, I won’t go into the setup of the original Apollo solution in detail. If you’re interested in the details, you can find the instructions in the official documentation.
Integrating Google Sheets with GTM Server-Side
In this blog post, I’d instead focus on a customized solution to show you how versatile and easily adaptable the foundational idea behind the Apollo solution is. And isn’t that what we all really want? A solution that can be tailored to our specific needs?
In the following sections, I’ll walk you through two exemplary use cases of using Google Sheets in combination with GTM Server-Side to enrich your data and improve your marketing efforts.
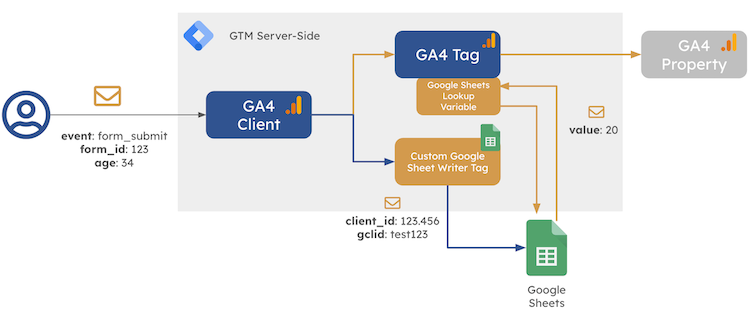 Exemplary GTM Server-Side Use Cases with Google Sheets
The first use case will show you how to read data from Google Sheets with sGTM, while the second one will demonstrate how to write data from sGTM to Google Sheets.
Reading Data from Google Sheets with GTM Server-Side
In this example, we’ll use a Google Sheets document to look up the conversion value for a given form and the user’s age input into the form. The Google Sheets document contains the following data:
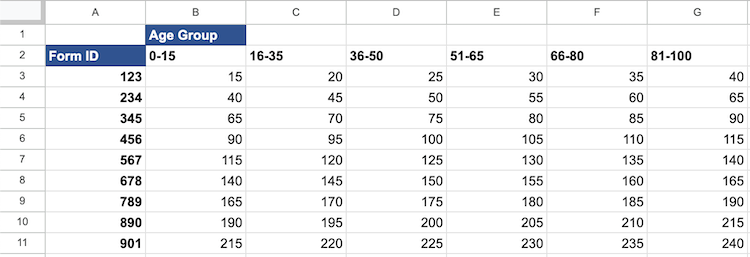 Exemplary Google Sheets Document
- Form ID: The unique identifier of the form
- Age Group: The age group of the user
- Custom Value: The conversion value for the form and age group
We’ll capture the form ID and the user’s age input in the GTM web container upon form submission, dispatch the form_submit event to the GTM server container, and then use a modified Apollo variable template to look up the conversion value from the Google Sheets document. The fetched value will then be passed on to a GA4 property or any other tag of your liking.
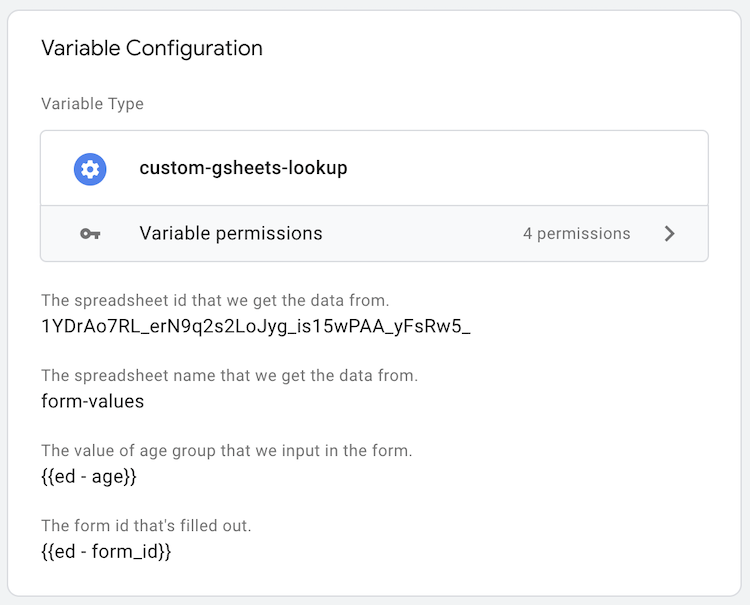 Exemplary Google Sheets Read Variable
The variable uses the Google Sheets API’s RESTful interface to fetch the data from the Google Sheets document. For this to work, you must provide the Google Spreadsheet ID, the name of the tab within the sheet, the range of cells to read, and an API key. The template provides input fields for the Spreadsheet ID and the tab name (see here for more information on how to obtain these values).
The range of cells is dynamically derived from the form ID and the user’s age input. For this example, I mapped the form ID to the row number and the age group to the column number in the Google Sheets document (s. above for the sheet). The following excerpt from the variable template code shows how I implemented the mapping:
// based on the age, assign on of the following age buckets and assing the COLUMN_NO: 0-15, 16-35, 36-50, 51-65, 66-80, 81-100
function getColumnNo(age) {
    if (age <= 15) return "B";
    if (age <= 35) return "C";
    if (age <= 50) return "D";
    if (age <= 65) return "E";
    if (age <= 80) return "F";
    return "G";
}

const COLUMN_NO = getColumnNo(data.age);

// based on the Form ID, assign the ROW_NO 123, 234, 345, 456, 567, 678, 789, 890, 901
const formIdToRowMap = {
    123: 3,
    234: 4,
    345: 5,
    456: 6,
    567: 7,
    678: 8,
    789: 9,
    890: 10
};

const ROW_NO = formIdToRowMap[data.form_id] || 11;
In our case, the form ID 123 and the age of 25 will map to the cell C3 in the Google Sheets document.
The last piece that needs to be added is authentication. In the past, obtaining API keys for Google services in sGTM took a lot of work (see here for Stape’s approach). Luckily for us, the Google team has introduced a new template API, getGoogleAuth, to authenticate with various Google services.
The following code snippet shows how to use the getGoogleAuth function to easily obtain an access token and pass it along with the request options to authenticate to the Google Sheets API from within the variable:
// Get Google credentials from the service account running the container (App Engine or Cloud Run default service account: Grant the service account access to the Google Sheet).
const auth = getGoogleAuth({
    scopes: [
        "https://www.googleapis.com/auth/spreadsheets"]
});

const requestOptions = {
    method: "GET",
    authorization: auth,
    timeout: 5000,
};

// make the request and return the value
return sendHttpRequest(url, requestOptions).then((result) => {
    log("result :" + JSON.stringify(result));
    setResponseStatus(result.statusCode);
    setResponseBody(result.body);
    setResponseHeader('cache-control', result.headers['cache-control']);
    const resultObject = JSON.parse(result.body);
    const returnValue = resultObject.values[0][0];
    log("value :" + returnValue);

    return returnValue;
});
Note: Make sure to grant either the App Engine or the Compute Engine default service account email address read permissions to the Google Sheets document from which you want to look up the values. Which one of the two you need to grant access to depends on the environment in which your GTM server container is running.
As you can see from the above, the variable compiles all the inputs and sends a GET request to the Google Sheets API to fetch the desired value. The entire process results in the following request that returns the desired value:
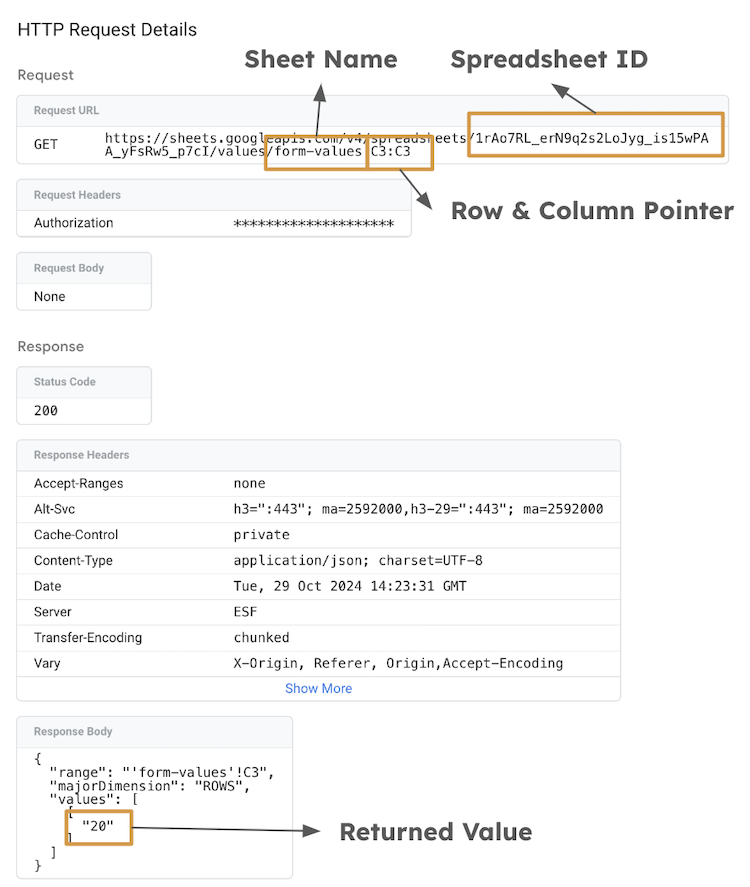 Exemplary Google Sheets Read Request
You can now use the variable in any tag you like to pass on the value to a platform of your choice.
Naturally, I’d like you to think about the above as a mere example to demonstrate the concept. You can easily extend this solution to include more complex data structures or additional data points.
Again, the beauty of this solution is its simplicity and flexibility. The familiar interface of a spreadsheet allows everybody to easily update the document with new values or add new columns and rows without changing the sGTM setup. These characteristics make the Google Sheets reads an excellent option for real-time data enrichment.
Writing Data from GTM Server-Side to Google Sheets
The second use case that I brought demonstrates how to write data from sGTM to Google Sheets. This is particularly useful for logging events or storing data that you want to analyze or integrate later.
For this purpose, I built a custom tag template that provides input fields for the Google Spreadsheet ID, the name of the tab within the sheet range of cells to write to, and the data to write. This is what the tag interface looks like:
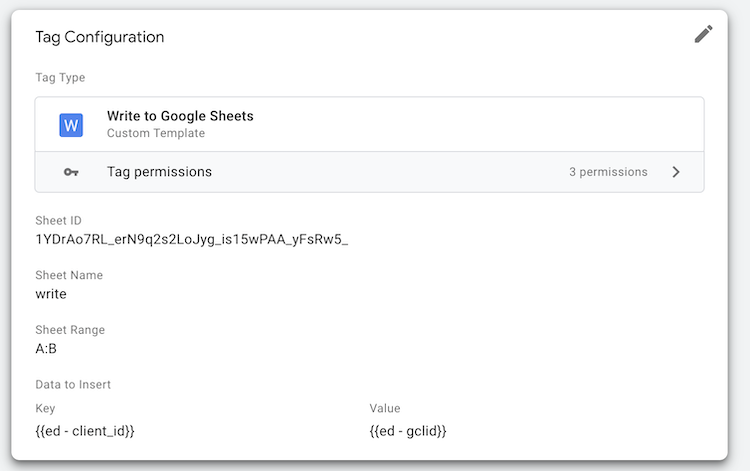 Exemplary Google Sheets Write Tag
The use case for this tag is to log the user’s client_id and the gclid parameter in the specified Google Sheets document upon a lead form submission. Further down the line, these data points can connect online campaign data with offline events (e.g., leads turning into customers).
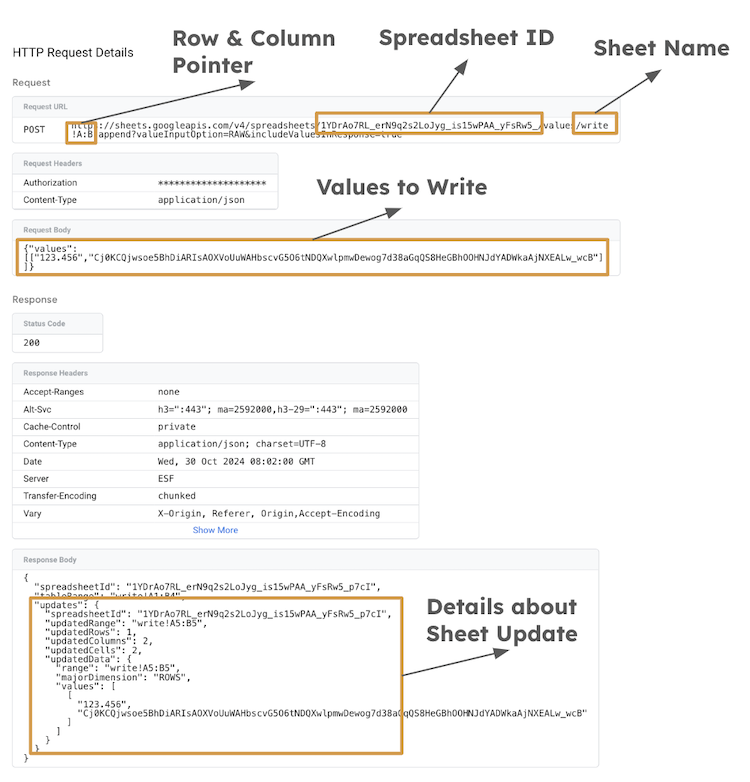 Exemplary Google Sheets Write Request
Under the hood, the tag compiles the data to write into a JSON object and sends an authenticated POST request to the Google Sheets API to append the data to the specified range of cells. The tag uses the spreadsheets.values.append method of the Google Sheets API to write the data. The input range searches for existing data and finds a “table” within that range. Values will be appended to the next row of the table, starting with the first column of the table. So, every time the tag is fired, a new row will be added to the table with the data to write.
Note: The Sheets API also allows for updates. If you want to update existing data, you can use the
spreadsheets.values.updatemethod instead. The functionality is similar to the append method, but you need to specify the range of cells to update.
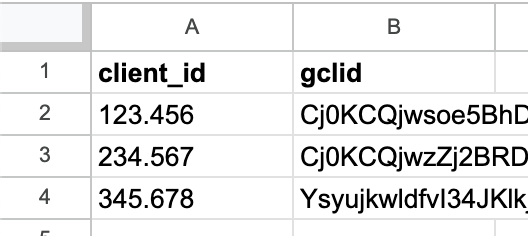 Exemplary Google Sheets Write Result
Note: If you’re interested in trying it out yourself, you can find the code and the entire template in this Github repo.
Storing data derived from your clickstream data in sGTM in Google Sheets is a great way to make it accessible to other teams or tools that don’t have direct access to GA4 or BigQuery. The approach is obviously more comprehensive than the use case described above. You can store any data you want to analyze or integrate later.
Google Sheets API and GTM Server-Side - Limitations & Quotas
To wrap up the sGTM Google Sheets integration topic, I want to make you aware of the limitations and quotas of the Google Sheets API when using it in combination with GTM Server-Side. Whether or not the Google Sheets integration into your setup is a viable option for your particular use case heavily depends on the volume of data you’re dealing with and the frequency of the requests you’re making. Hence, I advise you to carefully consider the following limitations and evaluate whether they align with your project’s requirements.
The API has a quota limit of 60 requests per minute per user per project - both for read and write requests. If you exceed this limit and the request fails, you’ll receive a 429 Too Many Requests error. Depending on your project’s requirements, you may need to adjust your implementation to avoid hitting this limit. If you really need it, you can request an increase in your quota from Google.
See here for more details about the usage limits of the Google Sheets API.
If you need a more scalable solution for looking up data, I recommend looking into Firestore instead. If you’re looking to store and analyze large datasets, BigQuery is the way to go.
Chaos – Writing Clickstream Data to BigQuery at Scale
For those managing large-scale data, Chaos from the sGTM Pantheon solution gallery is your tool of choice. Chaos makes integrating your sGTM environment with BQ easy, helping you store subsets of your clickstream data and conduct advanced analytics on top of it. BQ is Google’s solution for handling large datasets and complex queries.
Most of you are probably already familiar with the GA4 raw data exports to BQ, but with Chaos, you can now store any data you want in BQ and are not limited to the default exports.
Why Chaos?
Just as the infinite void of Greek mythology was filled by the world, Chaos fills BQ, a practically infinitely scalable database, with your event data. This integration gives you the ability to deliver on a wide range of use cases, such as:
- Real-time reports on a subset of data, e.g., for a specific campaign or product, can be generated in BQ and then visualized in Looker Studio. This will keep your query costs low and your reports up-to-date.
- Saving
gclid,client_id, anduser_idin BQ allows you to connect online and offline data, enabling more accurate attribution models. - Writing tag execution data to BQ can help you identify bottlenecks in your GTM setup and optimize your tag management strategy (s. Simo’s blog post on this here).
Let’s examine Chaos in more detail and consider how you can leverage it in your sGTM setup.
A Paradox: Chaos times two means control
The Chaos solution comes in two flavors (meaning two tags to choose from), each tailored to different use cases:
- Write to BigQuery: This tag allows you to send any data from sGTM—whether event data or variables (also from other Pantheon solutions)—directly to BQ. It is ideal for custom use cases where you need complete control over what’s stored and analyzed.
- Write Event Data to BigQuery: This is a streamlined version that automatically pulls data from sGTM’s event data model (meaning variables ar enot available), offering a faster, more straightforward setup.
Both variants can be customized within sGTM to match your unique needs, from schema setup to permissions. Eventually, this will give you full control over and offer flexibility for your data flow.
Regardless of which Chaos tag you choose, the prerequisites are identical. You need to make sure to have the following configured:
- Authentication: The service account running the GTM server container must have the
BigQuery Data Editorrole assigned to it. - Table Setup: You need to create a dataset and table in BQ to store the data. The table schema must match the data (e.g., column name and data type) you’re sending from sGTM.
Writing Data to BigQuery with GTM Server-Side
I chose a relatively uncomplicated use case for demonstration purposes: Writing purchase revenue (value) and profit data alongside user identifiers (user_id and client_id) to BQ.
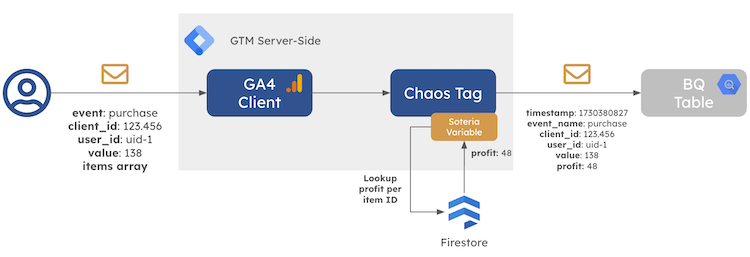 Exemplary GTM Server-Side Use Case with BigQuery
Upon successful purchase, the data is captured in the GTM web container and then dispatched to the GTM server container. The Chaos tag in the GTM server container sends the data to BQ. For this purpose, I use the Write to BigQuery tag template since I also want to include profit data, which is made available through the Soteria variable template.
Note: This example also shows how you can combine different Pantheon solutions, making your GTM setup even more powerful.
The following screenshot shows the schema of my dedicated write_to_bqtable in BQ:
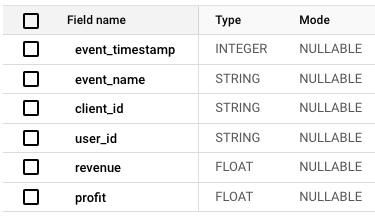 Exemplary BigQuery Table Schema
The tag interface provides input fields for the Project ID, Dataset ID, and Table ID to specify the destination table in BQ. Furthermore, you will notice that the Chaos’ tags configuration matches the table schema. It is critical to use the exact same order and field names as for the column names. Otherwise, the write attempt will fail.
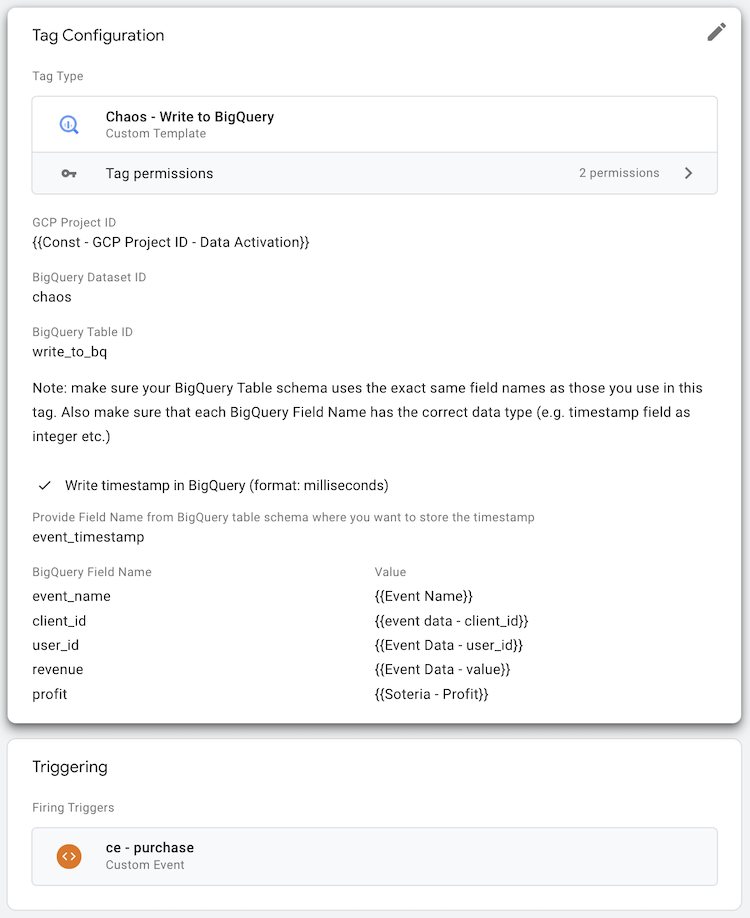 Exemplary Write to BQ Tag Configuration
Note: The same principles apply to the Write Event Data to BigQuery tag. The only difference is that the tag automatically pulls event data from sGTM and writes it to BQ. So, all you have to do is specify the field names from the event data you want to store in BQ.
Finally, the tag compiles the data to write into a JSON object and sends an authenticated POST request to the BQ API to insert the data into the specified table. The tag uses the tabledata.insertAll method of the BQ API to write the data. Here’s an excerpt from the tag template code that shows how the data from the input is compiled and the request is sent:
const BigQuery = require('BigQuery');

// Adding add attributes into eventData object
if(data.attributesList) {
  data.attributesList.forEach(param => {
    eventData[param.field] = param.value ? param.value : null;
  });
}

// Sending data to BigQuery
bigquery.insert({
  projectId: data.gcpProjectId,
  datasetId: data.datasetId,
  tableId: data.tableId,
}, [eventData], {}, () => {
  log('BigQuery Success: ', [eventData]);
}, (errors) => {
  log('BigQuery Failure: ', JSON.stringify(errors));
  data.gtmOnFailure();
});
The tag sends the data to BQ, and you can now analyze it, visualize it, or integrate it with other data sources. I mentioned a few use cases where this data could be helpful above. If you come up with another, please let me know! I’m curious to hear about your ideas.
Conclusion
And that’s a wrap for part three of the GTM Server-Side Pantheon series! I hope you enjoyed the deep dive into the Apollo and Chaos solutions and how they can integrate Google Sheets and BigQuery into your GTM Server-Side setup.
Both options are incredibly useful and versatile. They allow you to hook up your GTM Server-Side environment with two of the most widely used tools in digital marketing. I look forward to hearing about your experiences with these solutions and how you’ve integrated them into your GTM setup. If you need support getting started or have any questions, feel free to reach out to me.
Next up: Stay tuned for the last part (no. 4) of this series, where I’ll explore the integration of predictive analytics and generative AI using VertexAI into sGTM.
Happy tracking!
Book a meeting with me: Calendly